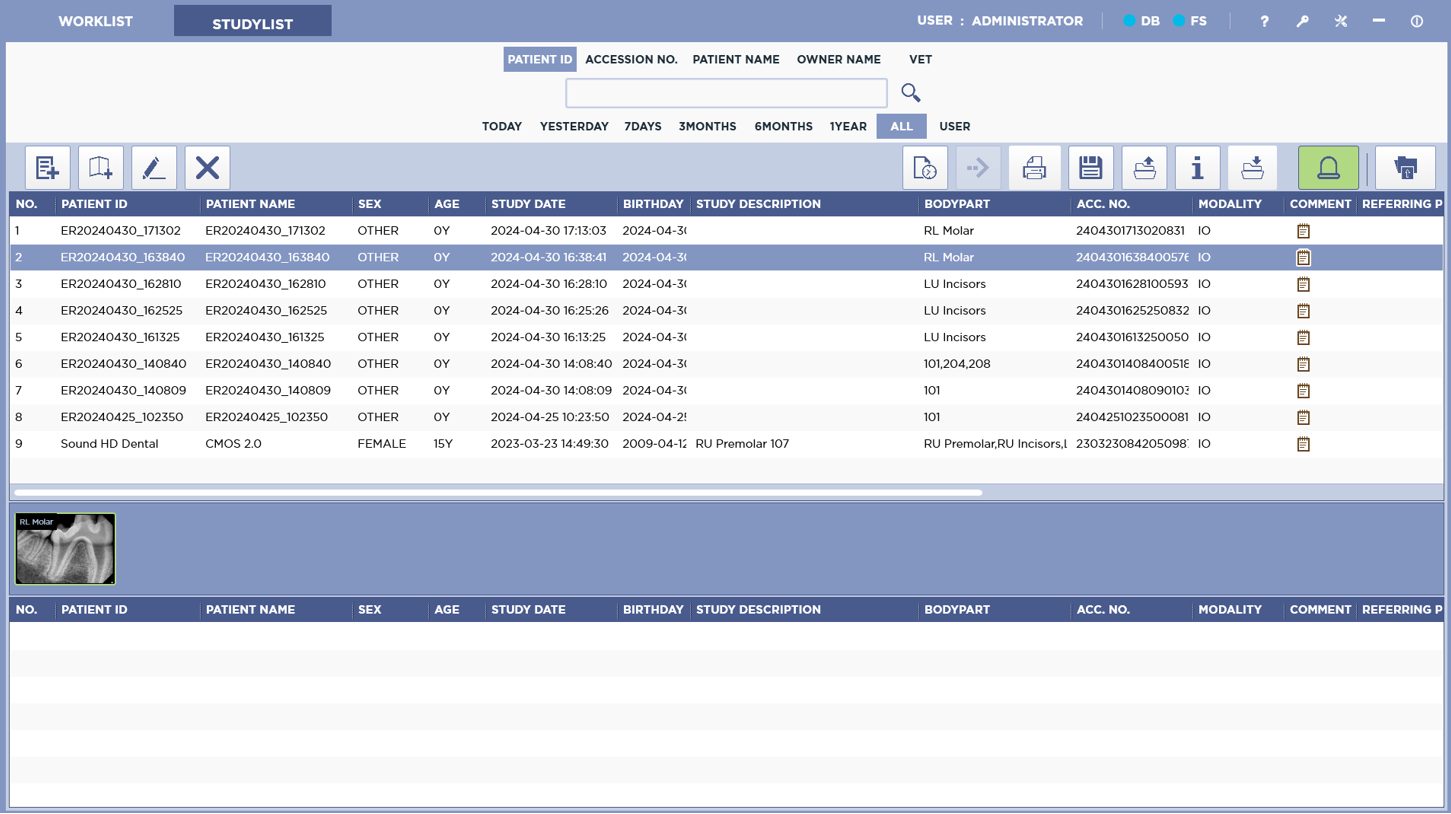
Studylist
Server Status & System Menu

User Account
This section of the Studylist displays the currently logged in user.
Server Status
In addition, the Server Status of the Database and File server ar shown. Blue icons indicate the server is connected. Red icons indicate the server is disconnected.
Log Off
Clicking the Log Off Button will log out the current user and take you back to the login screen.
Settings
Clicking the Settings button will open the Settings menu.
Minimize
Clicking the Minimize button will minimize MyVet Dent, allowing you access to the desktop.
Exit
Clicking this button will close MyVet Dent.
Search

You can search the studylist by a variety of filers. Patient ID, Accession Number, Body Part, Date, Patient Name, Modality, Etc.
You can select a date range manually or select a period (Today, Yesterday, 7 Days, 6 Months, 1 Year or All) to search in.
Main List
The Main List displays a list of completed studies. Double clicking a study will open it in the Viewer.
You can reorganize the column headers by Drag And Drop

Thumbnail List
This Displays a list of thumbnails from the study currently selected in the Main List.

Main Tools
New Patient

Pressing the New Patient button will open the New Patient Dialog. See Study Registration for more details.
Add Study

Pressing the Add Study button will immediately begin acquisition of a new study with the same patient information as the selected study.
Edit Info

Clicking the Edit Info button will open the Edit Info dialog. Here you can make your desired changes to the study information. Press the Modify button to save your changes. Press the Cancel button to discard your changes and close the dialog.
Delete

Pressing the Delete button will delete the currently selected study. You will be prompted to give a reason for deleting the study. In addition, you can select to not delete images that have not been sent to a server. Pressing the Reject button will delete the selected study. Pressing Cancel will dismiss the prompt.
You need to be logged in as an Administrator to delete studies.
History Manager
Pressing the History button will open up the History Manager. Here you can search the study history.

You need to be logged in as an Administrator to use the History Manager.
DICOM Send

Pressing the Send button will open the Send dialog. From here you can select which servers to send to. You can select multiple server. In addition, you can select to send all the images in the selected study or just the currently selected image.
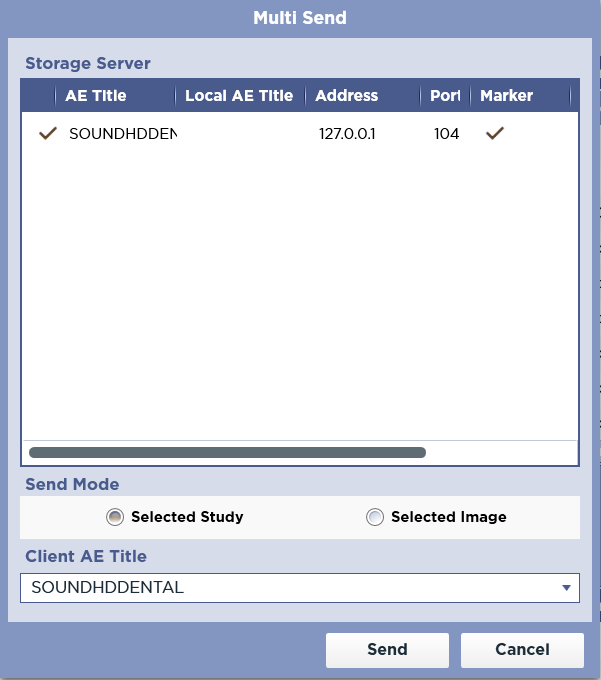
If no Storage Servers are configured, the Send button will be disabled.
Print

Pressing the Print button will open a sub-menu. Here you can select DICOM Print or Report.

DICOM Print
This option will open the Printer Manager.
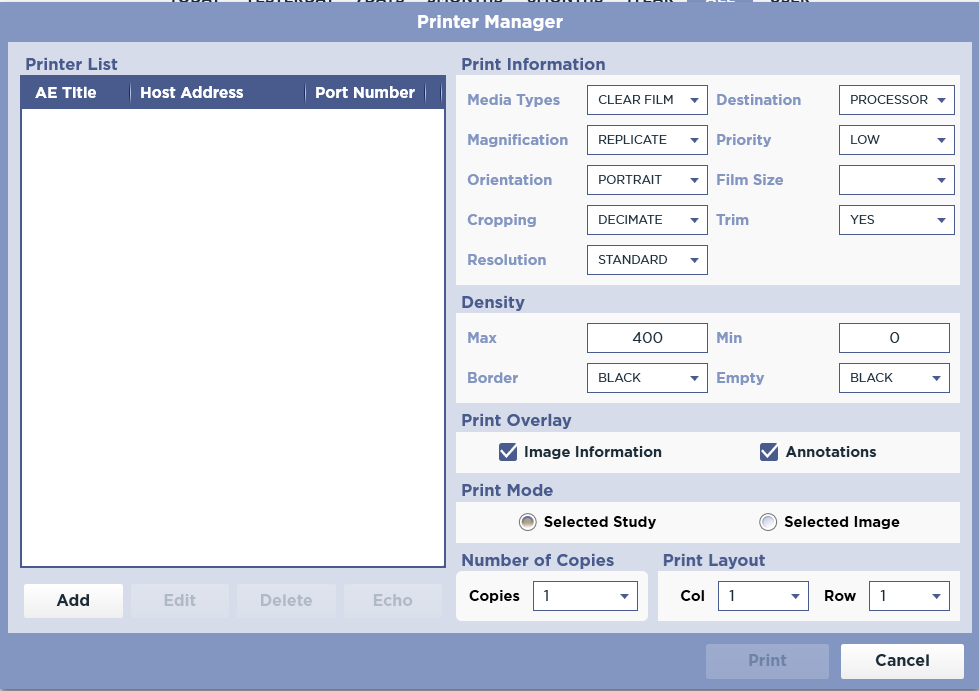
Here you can configure DICOM Printers. In the Printer List section, you can Add a new printer, Edit the selected printer, Delete the selected printer, and perform a C-ECHO to the selected printer.
The software limits the number of Printers to less than 20.
Configure the Printer Information, Density, Print Overlay, Print Mode, Number of Copies, and Print Layout.
Press the Print button to send the selected study or image to the selected printer.
Report
This option will open the Print Options dialog.
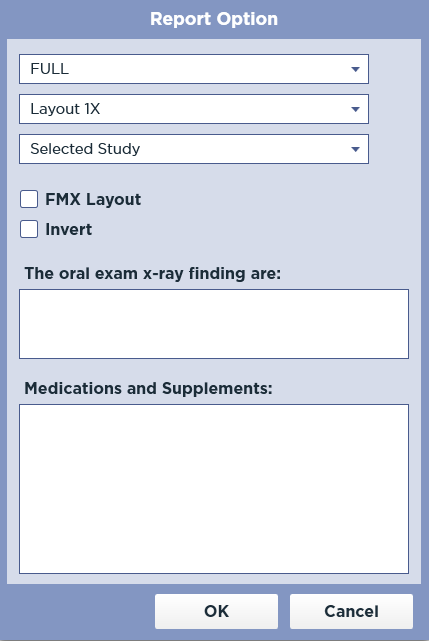
Choose your desired Layout and press Selected Study to generate a report and open it in the report viewer. Pressing Selected Image will generate a report for the selected image and open it in the report viewer. In addition you may choose to Invert the image(s) generated in the report. Pressing the Cancel button will close the Print Options dialog.
Press the Print button to print the report.
Save As

To save the selected study or image to another file format, press the Save As button. This will open the Save As Dialog.
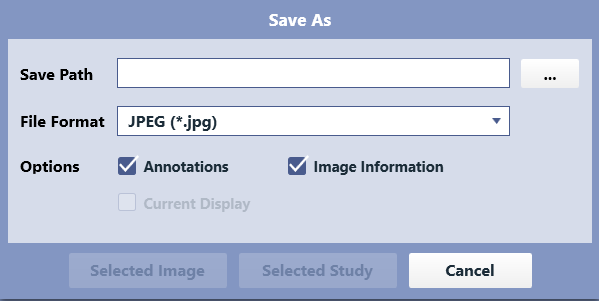
From here, press the browse button to specify a path. Select the File Format. Optionally you can include Annotations and Image Information.
While you may use the Save As feature to save the images in DICOM format, a viewer will not be included. To include a viewer, use the Export feature.
Export

Pressing the Export button will open the Data Export dialog.

Select CD Burn to burn the study to a CD. Select Disk (Folder) to export the study to a folder. Press the Export Button to start the export. A Viewer will be included.
Queue
Pressing the Queue button will open the Study Queue.
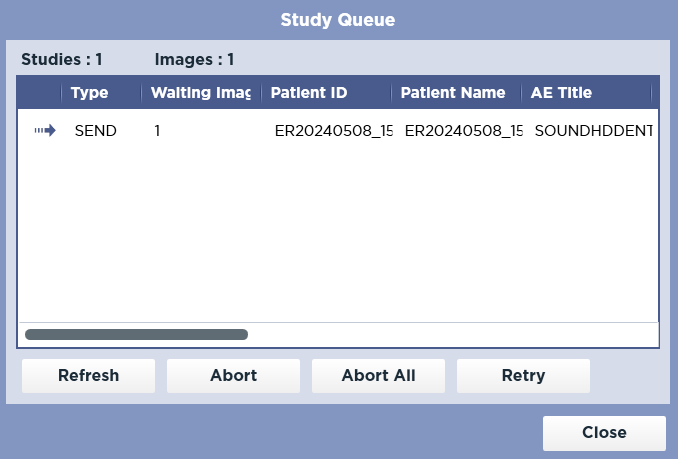
Here you can see the transmission status of studies sent to a dicom device.
The total number of studies and images in the queue are displayed. You can press the Refresh button to update the list. Pressing the Abort button will Abort the sending of the selected Study. Pressing the Abort All button will abort all transmissions in the queue. Pressing the Retry button will attempt to re-send failed transmissions. To close the dialog, press the Close button.
A Study that has started sending cannot be canceled.
Import

To import external images, press the Import button. This will open a sub-menu.

Selecting Select Folder will allow you to import all images in a folder. Selecting Select File will allow you to select specific files to import. Selecting DICOM DIR will import files in a DICOM DIR.
Emergency

Pressing the Emergency button will immediately create a study and begin acquisition.
The study information will be automatically generated. It is suggested that you edit the study information before completing the study or sending to PACS.
Open Study

Pressing the Open Study button will open the selected study in the Viewer. You can also open a study by double clicking on it from the Main List.