Configuration
To adjust the scan settings, tap the Menu icon.
If the preset panel is displayed, select Menu at the top to access the settings panel.
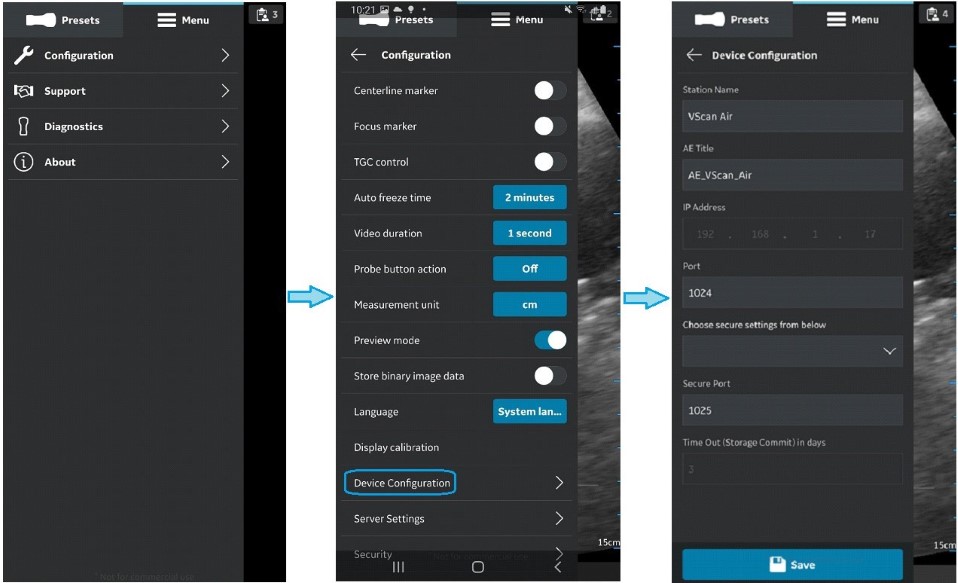
The Configuration option displays - Centerline marker, Focus marker, TGC control, Auto freeze time, Video duration, Probe button action, Measurement unit, Preview mode, Store binary image data, Language, Display Calibration, Device configuration, Server settings and Security.
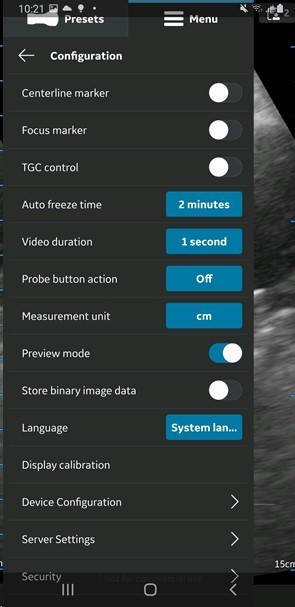
Centerline Marker
Tap the ON/OFF toggle switch to turn ON or OFF the Centerline Marker. When turned ON, Vscan Air app displays the Centerline Marker during black and white, color imaging, in Freeze mode and on recalled images and videos.

Configure the display device with an adequate 'screen-save' timeout. Configure the app with an adequate ‘auto freeze’ timeout in case of performing guidance procedures where no user interface interactions are expected during the course of the procedure.
Focus Marker
Tap the ON/OFF toggle switch to turn ON or OFF the Focus Marker. When turned ON, Vscan Air app displays the focus marker in black and white, color imaging, in freeze mode and during replay.
Time Gain Compensation (TGC) Control
Tap the ON/OFF toggle switch to turn ON or OFF TGC controls. When TGC is ON, you can adjust the black and white image via the TGC controls on the scan screen.
For adjustment up to 6 TGC controls are available in portrait and landscape layouts.
The active gain control is disabled as long as the TGC controls are active.
Auto Freeze Time
- Press Auto Freeze Time
- Tap on the desired value to set the auto freeze time. This sets the time after which the system enters Freeze mode when not in use.
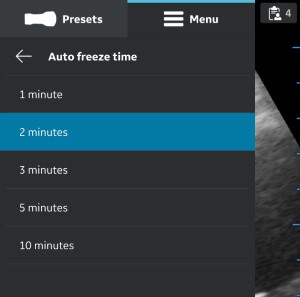
Configure the display device with an adequate 'screen-save' timeout and 'auto freeze' timeout in the case of performing guidance procedures where there is no user interface interaction over the course of the procedure.
Video Duration
- Press Video duration - The video duration is related to the number of seconds of scan data that is available in the buffer after freezing the image.
- Tap on the desired value to set the buffer size.

Probe Button Action
- Press Probe Button Action.
- Tap to choose either Freeze or Save with probe button press. Choose 'Off‘ to configure no action with the button press.

Measurement Unit
Tap to choose either cm or mm.

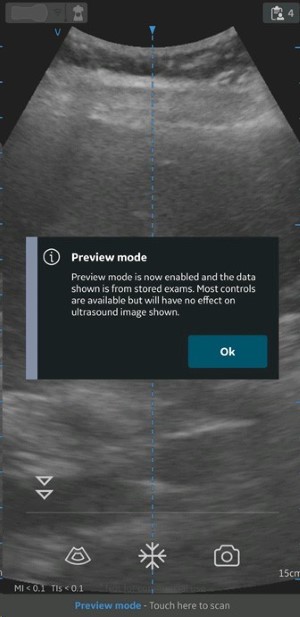
Preview Mode
Tap the ON/OFF toggle switch to turn ON or OFF the preview mode. Press OK if you wish to use the preview mode.
Store Binary Image Data
Tap the ON/OFF toggle switch to turn ON or OFF the binary image data. When turned ON, a pop-up message displays - “Binary image data storage is now enabled and unprocessed data will be stored together with video clips. This uses some additional storage space. Binary image data is useful for research and development in collaboration with GEHC.
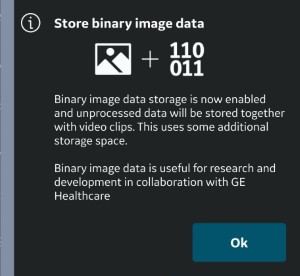
Press OK to confirm that you wish to configure your device with the binary image data store functionality.
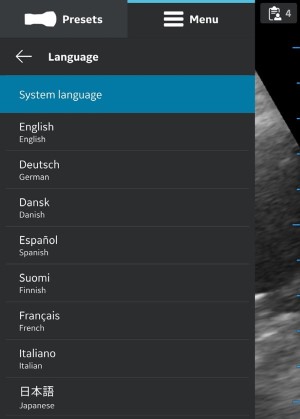
Language
Choose the desired language
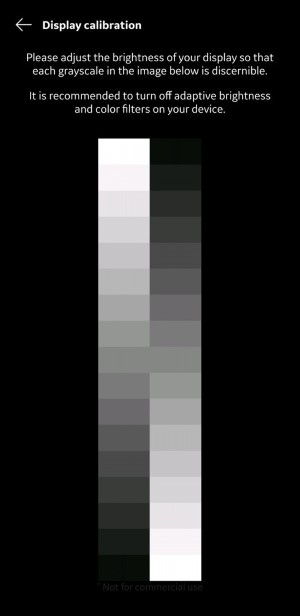
Display Calibration
The images can be used to adjust the brightness level of the device, so that a full range of grey scale level is visible. It is recommended to turnoff adaptive brightness and color filters on the device.
Device Configuration
- Follow the procedure below to configure the device. Configuration -> Device configuration.
- Enter the default values for the Device configuration (Vscan Air) on the screen to establish communication with DICOM servers.
Server Settings
Allows to configure the Modality Worklist Server, DICOM Image Server, Network Shared Folder.
- Modality Worklist Server - Retrieves patient and intended study information.
- DICOM Image Server - Remote store location for videos/images.
- Network Shared Folder - Share images/videos to a shared folder on a PC.