Advanced Options
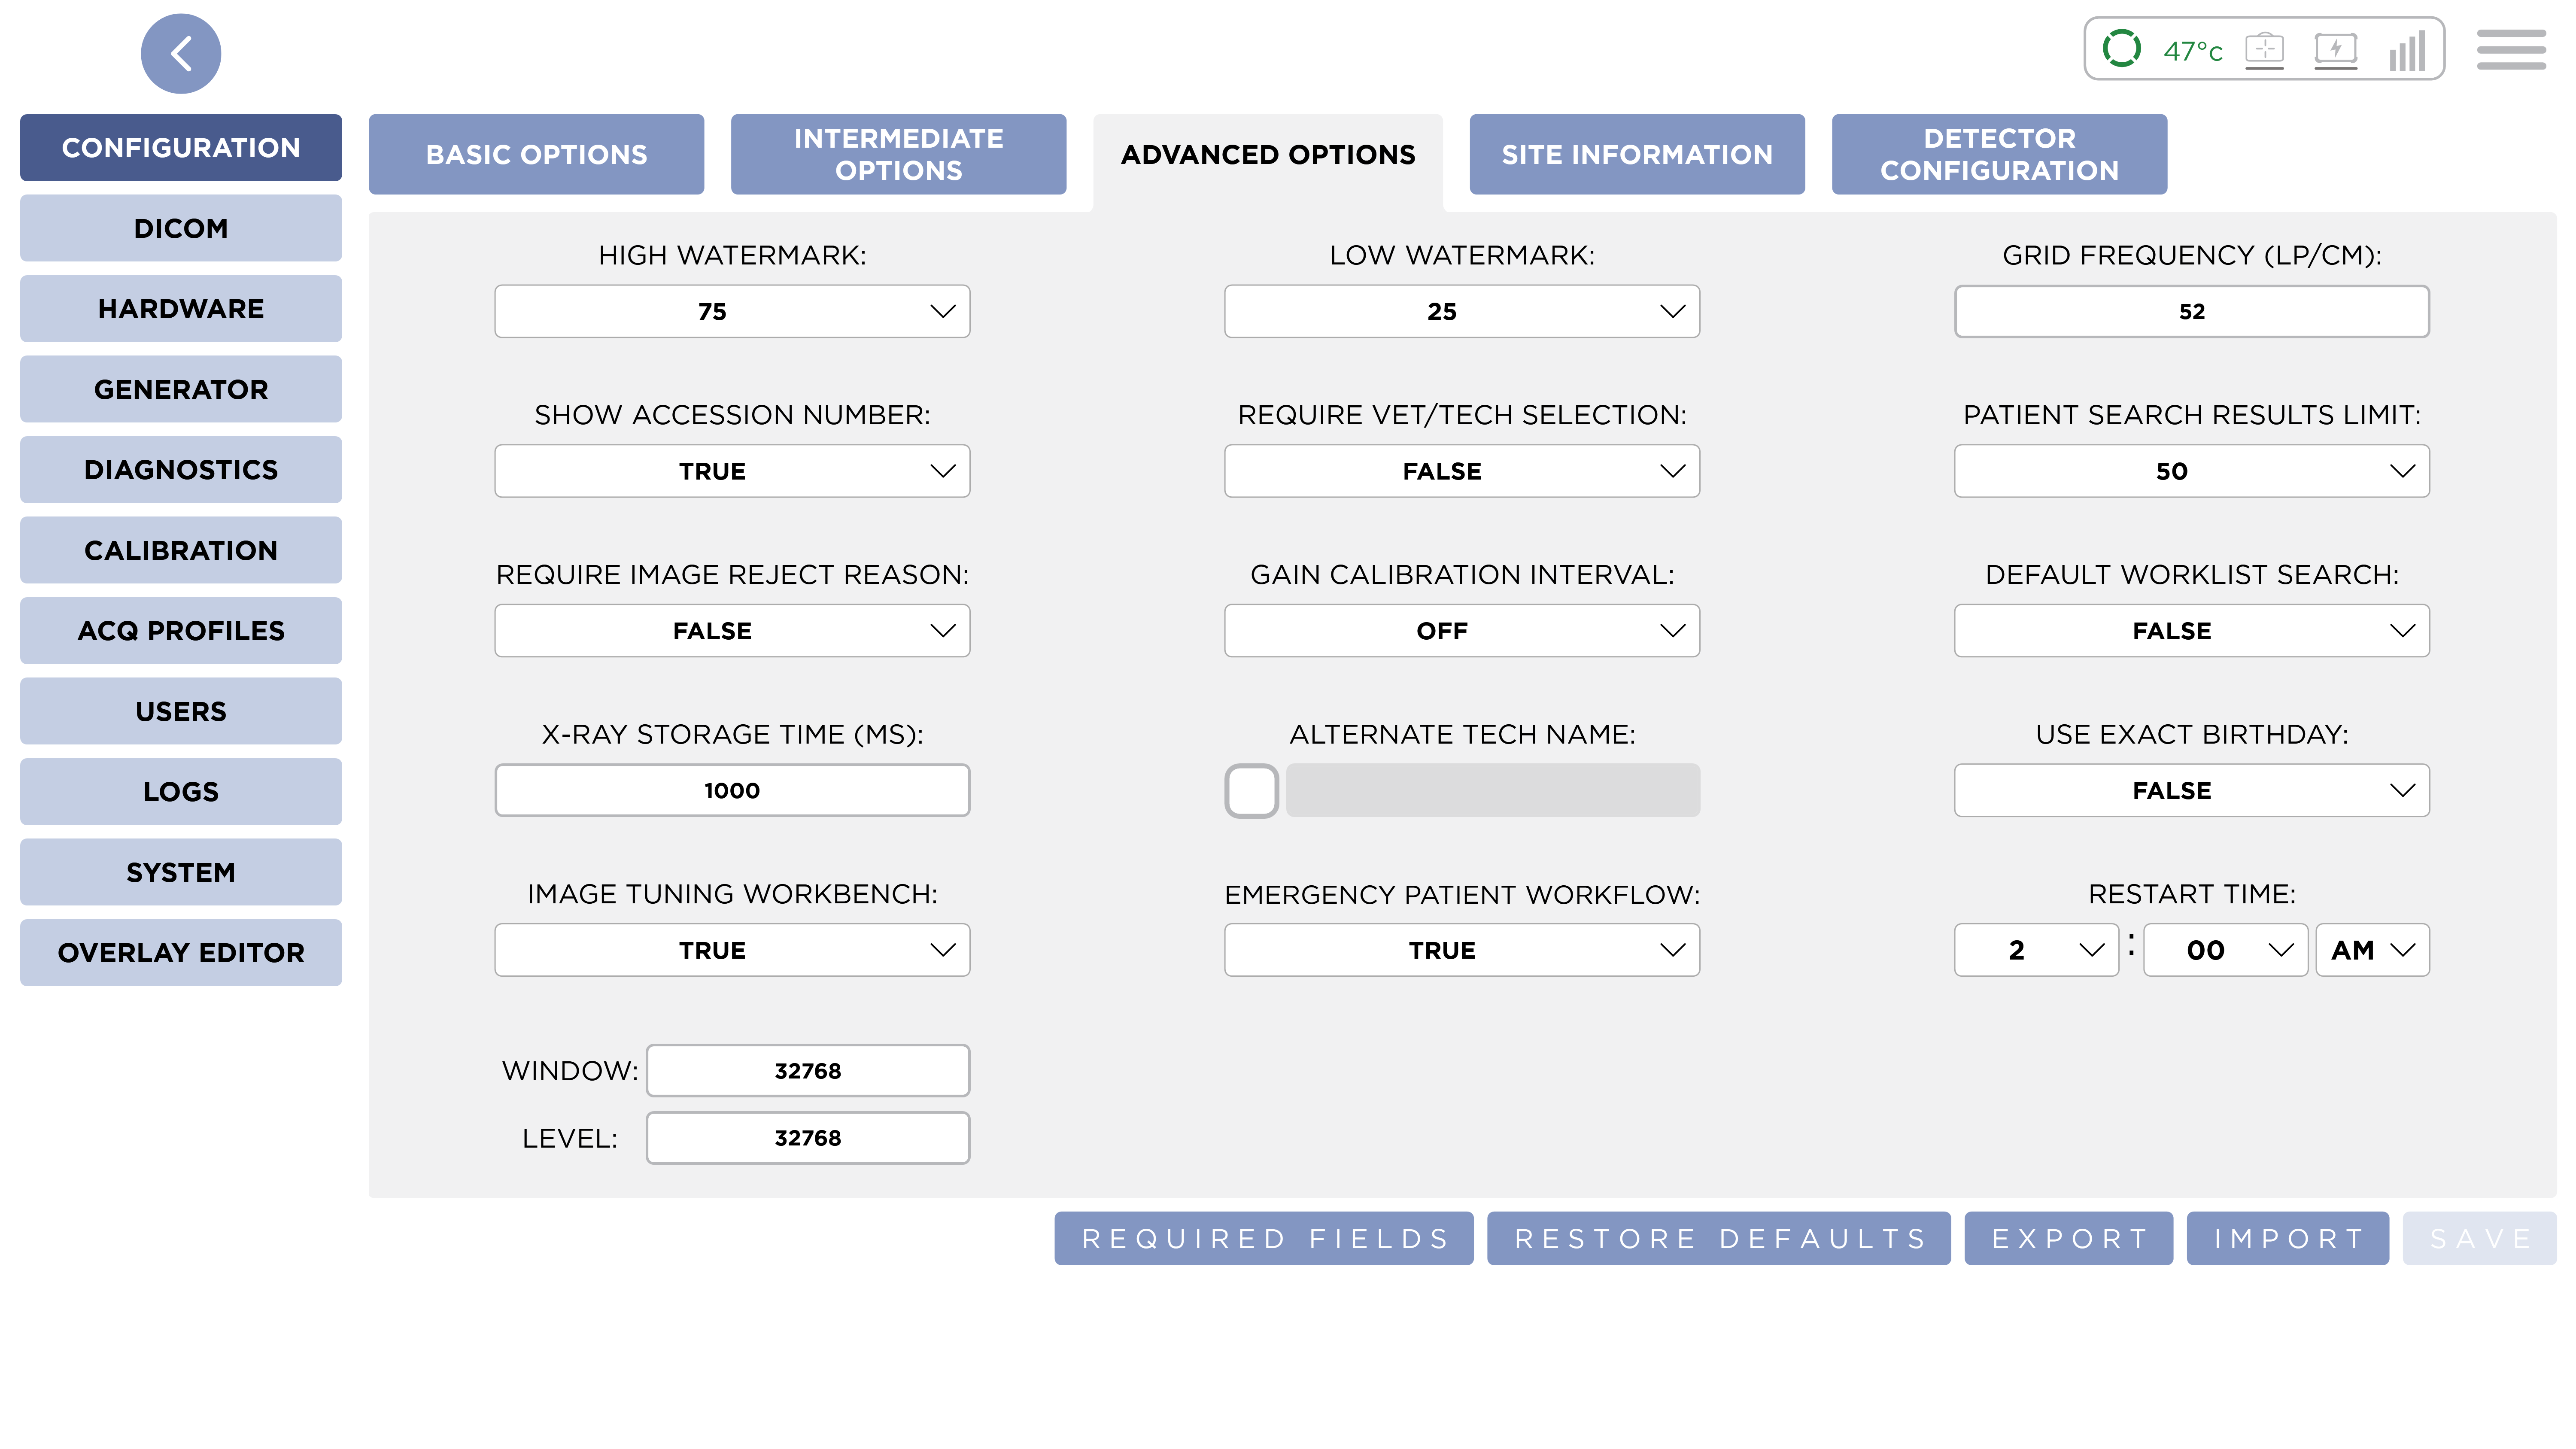
High Watermark
This option sets the percentage of disk space usage at which the Watermark system will begin to delete old studies. You can set it to 90, 75, or 50 percent.
To disable the Watermark feature, set this to Never Delete.
The default setting is 75 percent.
Low Watermark
This option sets the percentage of disk spaces usage at which the Watermark system will stop deleting old studies. It can be set to 75, 50, or 25 percent. However, it must be lower than the high watermark. By default this is set to 25 percent.
Grid Frequency (LP/CM)
The Line Pairs Per Centimeter measurement of the Grid.
If you are not using a grid this has no effect.
Incorrect Grid Frequency can cause image quality degradation.
Show Accession Number
When this option is set to True, the Accession Number field will be added to the Add Study Form, the Add Study Form, and the Edit Patient Form. By default this is set to True.
Require Vet / Tech Selection
When set to True this option will require users to select a Vet and a Tech in the Acquire Review Screen before ending a study. The Vet and Tech Combo boxes will be outlined in red to indicate they are required. By default this is set to False.
Patient Search Results Limit
This option will limit the number of results shown on the main patient screen. By default, it is set to 50. Options are:
- 50
- 100
- 250
- 500
- 1000
- 2500
- 5000
Require Image Reject Reason
When set to True the user will be required to select a reason when rejecting an image. They will see a form popup with a Combo Box with reasons for the rejection. By default this is set to False
Gain Calibration Interval
This option will set the period of time between the last calibrating and when you will receive a notification that it is time to do a new calibration. The system will notify once every two hours you with the message:
The active Detector is due for a gain calibration.
If you wish to disable the notification, set this option to Off. The default setting for this option is Off.
- Quarterly
- Semiannually
- Annually
- Off
Default Worklist Search
When this is enabled, the Search in the Main Patient Screen will search the configured worklist server by default.
X-Ray Storage Time (ms)
This option affect the amount of time the Detector will accumulate dose. Lower values will produce less noise in the final image. The maximum value is 1000 milliseconds.
This setting will affect image quality. It is not recommended to change this setting unless directed to do so by a Sound Customer Support.
Alternate Tech Name
This option will rename the user type 'Tech' and any references to it with a custom name throughout SmartDR Fusion. Toggle this feature on and off using the checkbox beside it labeled 'Enabled:'.
This is an example of Tech being replaced by the word 'Banana'.

Use Exact Birthday
When this is set to 'True', you must enter an exact date using the calendar when adding/editing patients. The default is 'False';
Image Tuning Workbench
When this is set to 'True', the Image Tuning Workbench is available for acquired images in the Acquire Review Screen. The default is 'True'.
Emergency Patient Workflow
When this is set to 'True', Emergency Patients can be Created. The default is 'True'.
Restart Time
This is the time the system will restart each day. The system will automatically defer restart if it detects user activity, if DICOM images are currently being sent, or if the application in the Acquire Review screen. Before the system restarts, a dialog will be shown to the user.
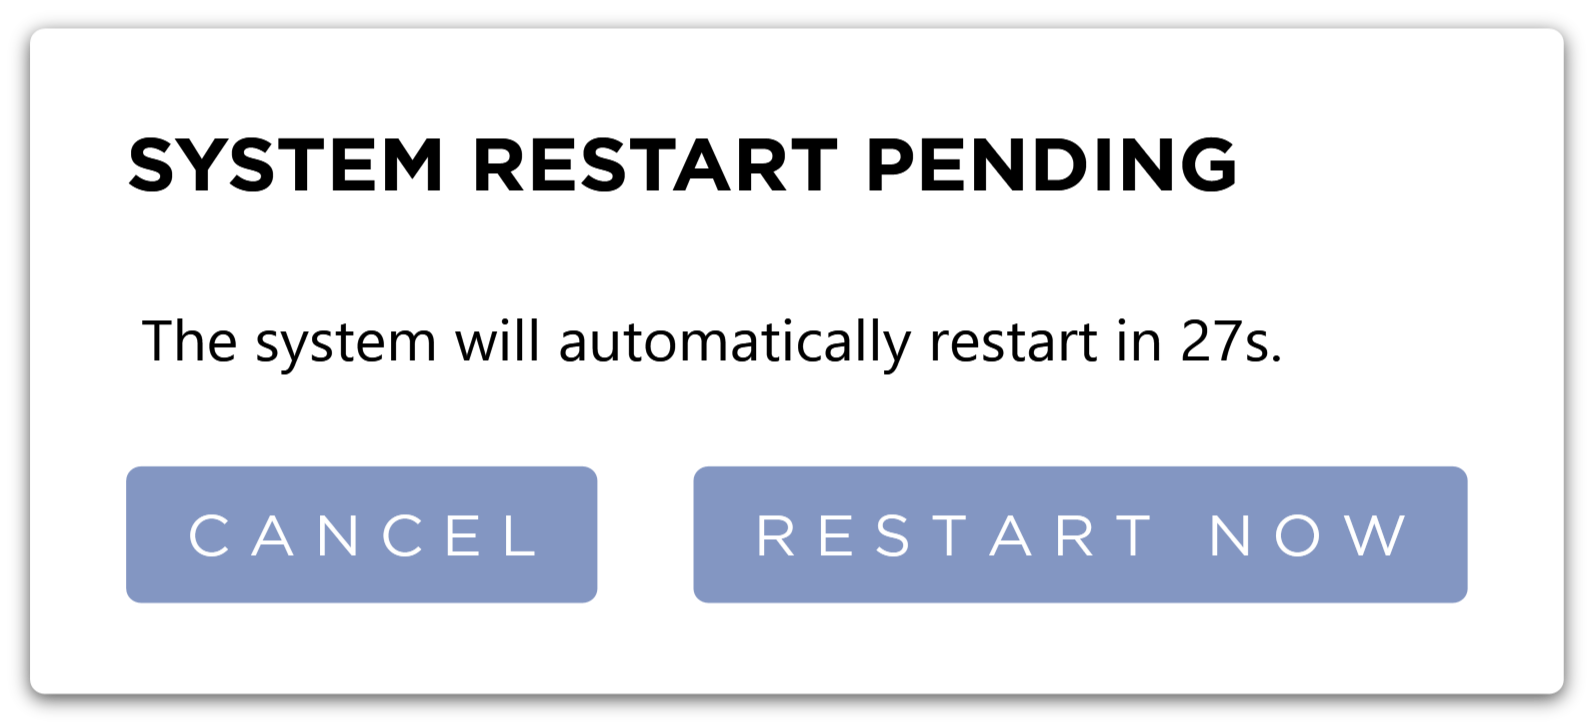
This dialog will count down from 30 seconds. Pressing the Cancel button will deffer the restart. Pressing the Restart Now button will close the dialog and immediately restart the System.
Window / Level
These options will set the default Window and Level applied to images when they are acquired.
Required Fields
Pressing the Required Fields button will open a dialog where you can select additional fields to be required when adding and editing a patient.
The required fields as noted in Create a Patient are always required.

Here you can select which fields will be required when adding or editing a patient. To make a field required, you can select it from the Available list and move it to the Required list with the Right arrow button. You can select multiple fields. Additionally. double clicking an item will move it to the other list. To make a field not required, move it to the Available list.
Weight is required by the system for small animal species (e.g. Canine, Feline, etc.) but not for large animal species (e.g. Equine, Bovine, etc.). By adding Weight to the Required Fields, you can make it required for all species.
Export / Import
Click the Export button to export the system's configuration. The Save File Dialog is show. Select the location you would like to save the configuration to, and give the file a name. Press the Save button.
To import a previously exported configuration, press the Import Button. This will show a file selection dialog. Select the file you wish to import and press the open Button. The Import Options Form will be shown.
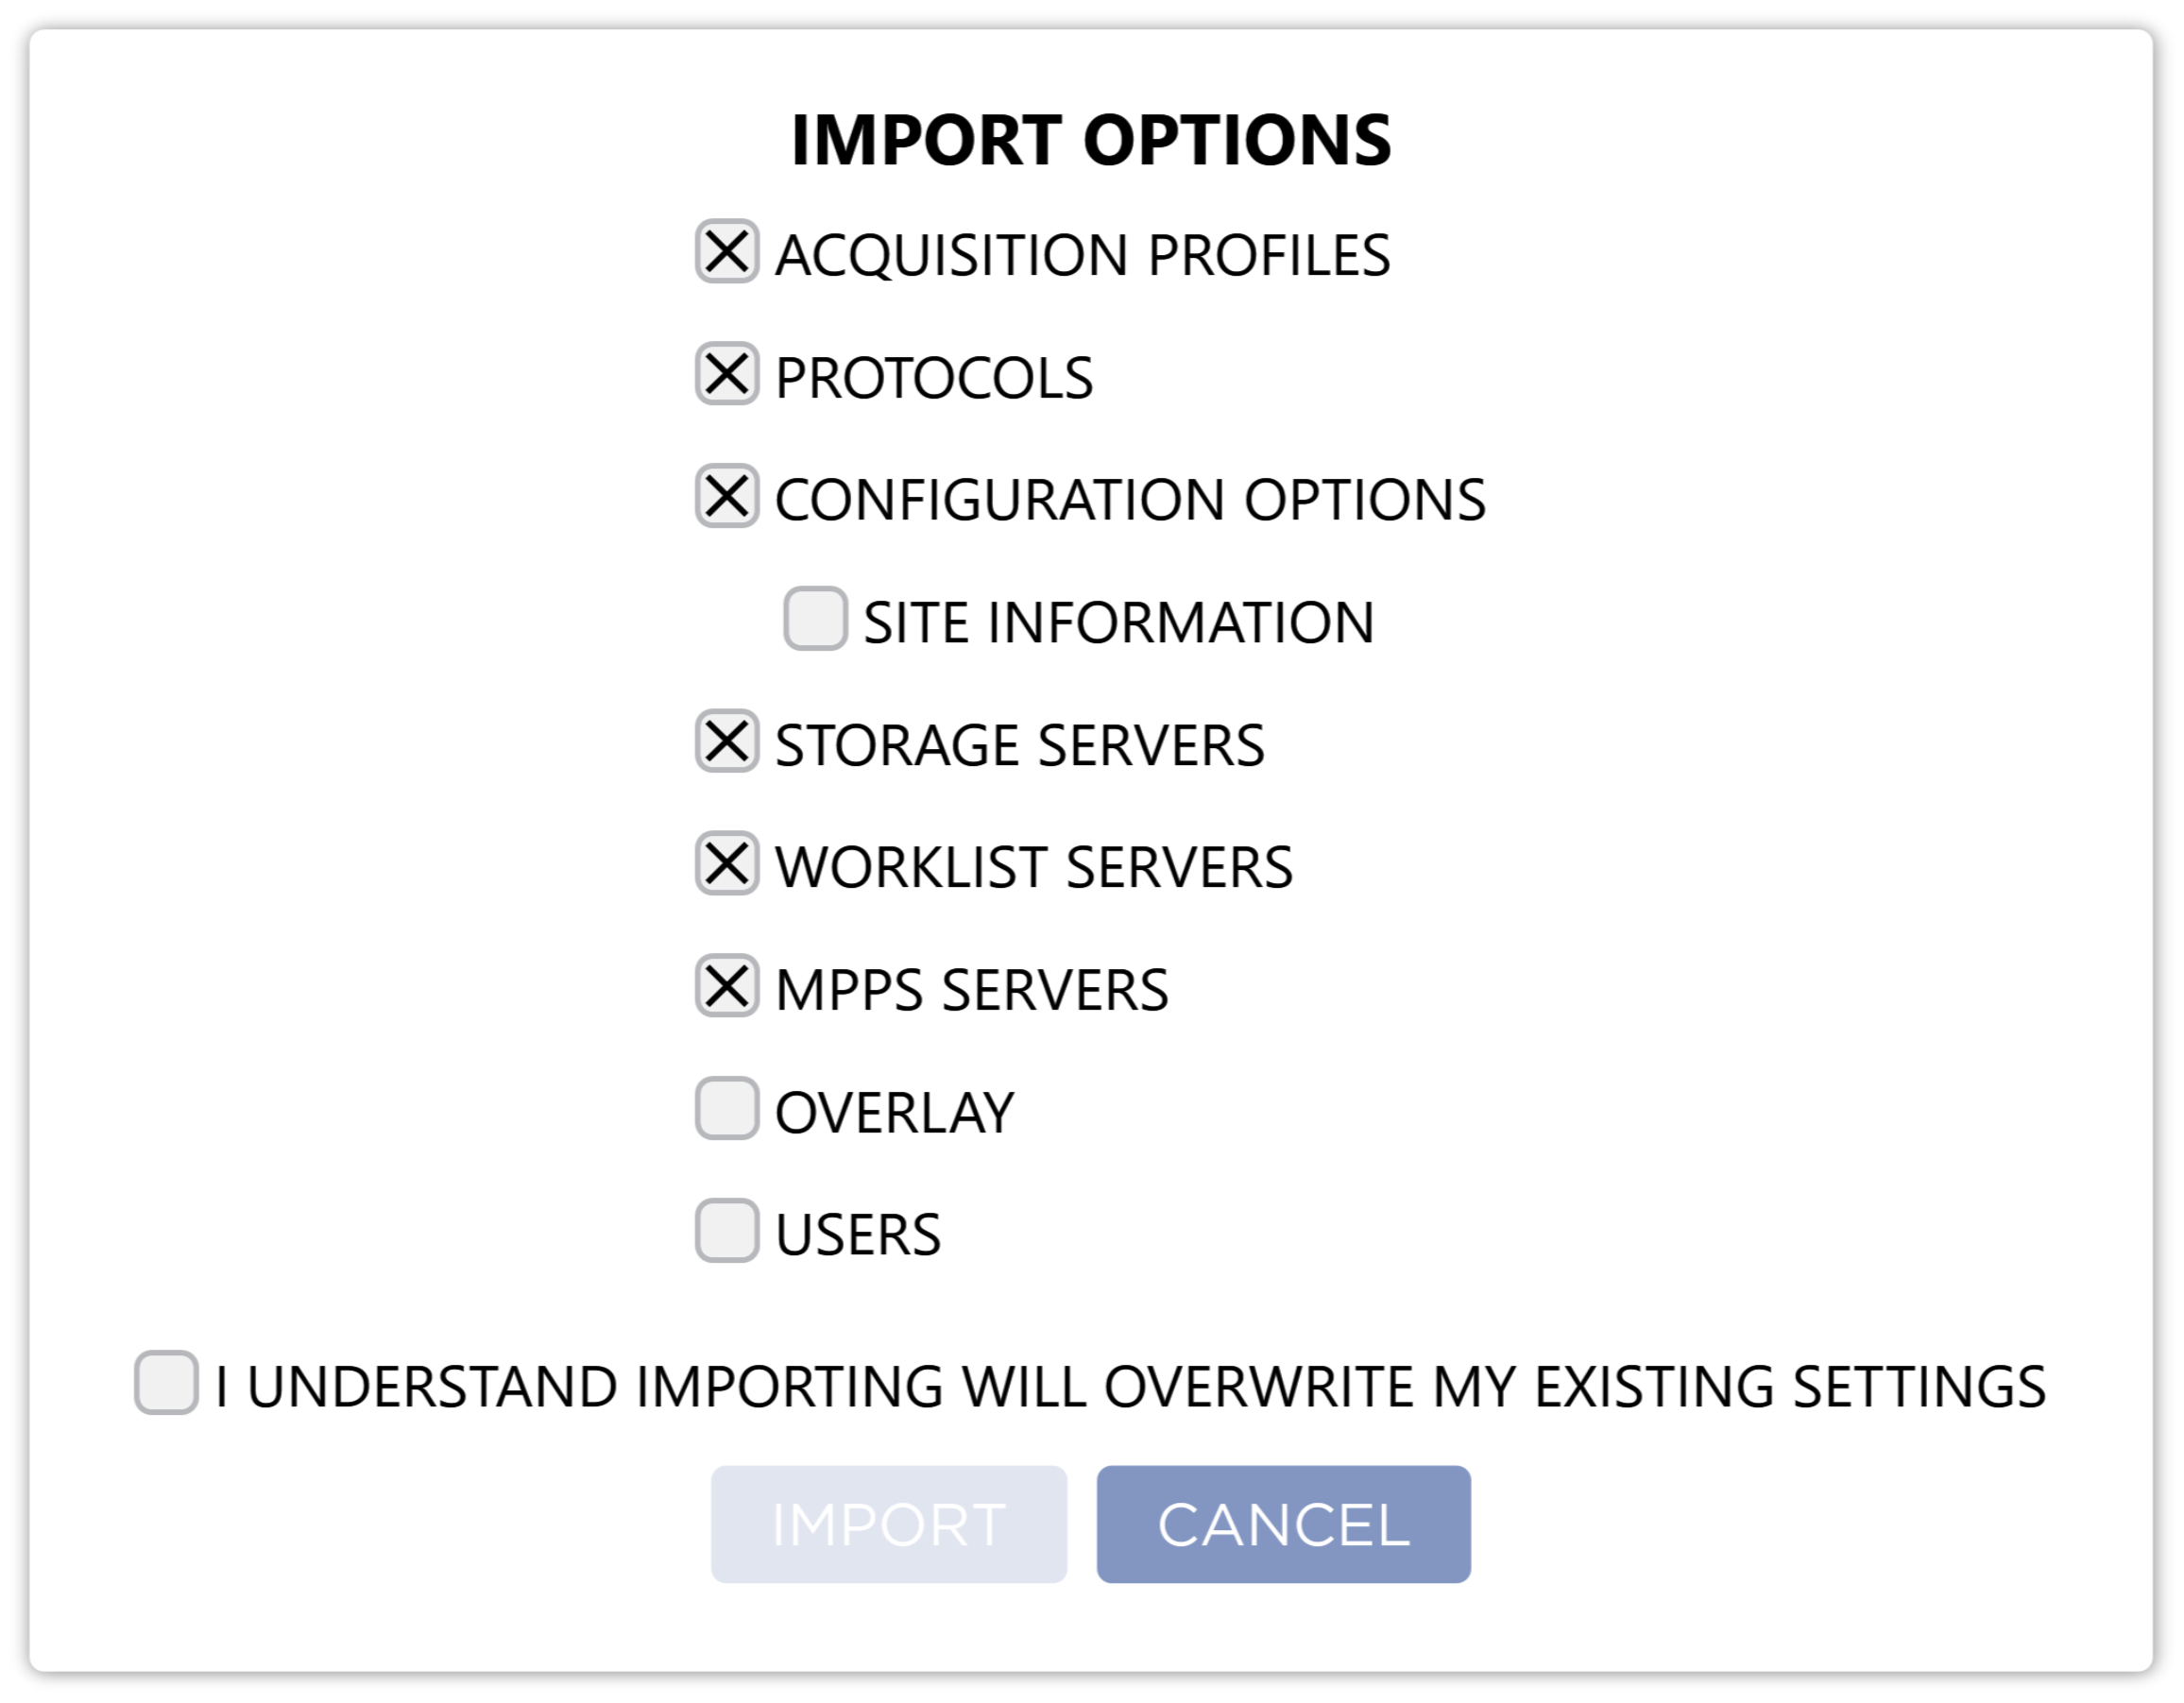
Select the configurations you wish to import.
- Acquisition Profiles
- Protocols
- Configuration Options
- Site Information
- Storage Servers
- Worklist Servers
- MPPS Servers
- Overlays
- Users
Confirm you understand that importing will overwrite your existing settings. You can abort importing a configuration by pressing the cancel button. Press the Import Button to start the import process. The Import Process Dialog will show.

When the import completes, the Close button will be active.

Press the close button and the application will restart.
If an error occurs during import, contact Sound Customer Support.
Importing configuration will overwrite your existing configuration.
Restore Defaults
The Restore Defaults button is used to restore the Basic, Intermediate, and Advanced Config Options to their factory default settings. A confirmation dialog box will ask you to confirm the action because it cannot be undone.
Save
To save changes you have made, press the Save button.